10 Easy Steps to Repair a Car Leather Seat
Car leather seats are a luxurious addition to any vehicle, but they can be expensive to replace if they become damaged. Luckily, there are some easy steps you can take to repair a car leather seat yourself.
1. Clean the affected area with a mild soap and water solution. This will remove any dirt or debris that may be preventing the repair from taking hold.
2. Use a leather conditioner on the seat. This will help to restore flexibility and pliability to the leather so that it can better accept the repair.
3. Apply a small amount of saddle soap or mink oil to the area surrounding the damage. This will help to lubricate the leather and make it more workable.
4. Use a sharp knife or razor blade to cut away any frayed or loose edges of leather around the damage. This will create a clean surface for the repair to adhere to.
5. Place a piece of thin cloth over the damaged area and use a heated iron to press it down firmly. This will melt the adhesive on the back of the patch and cause it to adhere more securely to the seat.
6. Allow the seat to cool completely before moving on to step seven.
7. Once cooled, trim away any excess cloth from around the patch using scissors or a sharp knife. Be careful not to cut into the leather itself!
8. Apply another layer of saddle soap or mink oil over the top of
can you repair the scuffed leather
If you have a car with leather seats, it’s important to know how to keep them clean and free of damage. One common issue that can occur is scuffed leather. While this may not seem like a big deal, it can actually lead to bigger problems down the road if not addressed.
Fortunately, repairing scuffed leather is relatively easy and only requires a few steps. Here’s a quick guide on how to do it:
1. Start by cleaning the area around the scuff with a damp cloth. This will remove any dirt or debris that could potentially make the repair more difficult.
2. Next, use a leather cleaner to gently clean the scuffed area. Be sure to follow the instructions on the cleaner to avoid damaging the leather.
3. Once the area is clean, apply a small amount of leather conditioner with a soft cloth. This will help prep the leather for repair.
4. To start repairing the scuff, use a sharp knife to carefully remove any loose pieces of leather from the area.
5. Next, apply a thin layer of leather filler to the area, using a putty knife or other similar tool. Be sure to smooth out the filler so it’s flush with the surrounding area.
6. Allow the filler to dry completely, then sand it down until it’s level with the surrounding leather.
7. To finish up, apply another layer of conditioner and buff it
how to repair rip in a leather car seat
If you have a rip in your leather car seat, don’t despair! With a little time and effort, you can repair it and make it look like new again. Here’s how:
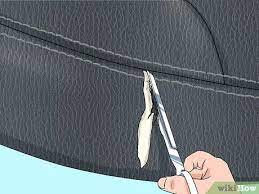
1. Start by cleaning the area around the rip with a leather cleaner. This will help remove any dirt or debris that could interfere with the repair.
2. Next, use Leather Adhesive to glue the edges of the rip together. Be sure to use enough adhesive to hold the edges together securely.
3. Once the adhesive has dried, it’s time to start stitching the rip closed. You can either do this by hand or with a sewing machine. If you’re using a sewing machine, be sure to use a heavy-duty needle and thread that’s designed for leather.
4. Once the rip is closed, apply a small amount of Leather Conditioner to the area. This will help keep the leather soft and supple.
5. Finally, use a Leather Protector to help prevent future damage. This will create an invisible barrier that will help protect your seat from spills, stains, and everyday wear and tear.
You will need a leather repair kit, scissors, sandpaper, and a hairdryer.
1. Begin by using the sandpaper to roughen up the area of leather that you will be repairing. This will help the repair kit’s adhesive to better adhere to the leather.
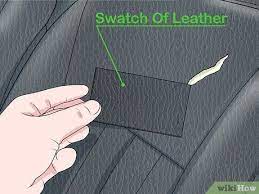
2. Next, use the scissors to cut a piece of leather from the repair kit that is slightly larger than the area you are repairing.
3. Apply a thin layer of adhesive to the back of the repair piece and then press it firmly onto the damaged area.
4. Use a hairdryer on its lowest setting to apply heat to the repaired area for about 30 seconds. This will help to set the adhesive and bond the repair piece securely to the leather surface.
Cut a piece of the backing material from the kit to fit over the rip.
Use a utility knife to cut the backing material to fit over the rip.
Remove any loose threads from the ripped area.
Place the piece of backing material over the rip and hold it in place with masking tape.
Use a heat gun to heat the area around the rip.
Press the repair patch firmly onto the adhesive while it is still hot.
Apply pressure to the entire repair area for 30 seconds while the patch cools.
Apply adhesive to the backing material and attach it to the underside of the rip.
Use a putty knife to spread the adhesive evenly over the backing material.
Position the rip so that it is centered over the tear, then press it firmly into place.
Smooth out any wrinkles or bubbles with your fingers.
Allow the adhesive to dry for at least 24 hours before using the furniture piece.
Trim any excess material from the edges of the rip.
Use a sharp knife or box cutter to make a clean cut along the rip. Be sure to cut perpendicular to the tear.
If the ripped material is frayed, use a lighter to carefully singe the edges. This will help prevent further tearing.
Apply adhesive tape to both sides of the rip, being sure to smooth out any bubbles or wrinkles. Press firmly along the entire length of the tape.
For best results, allow the adhesive tape to set for at least 24 hours before subjecting the area to stress or wear.
Use sandpaper to smooth out the edges of the repair.
Now that the repair is complete, use sandpaper to smooth out any rough edges. This will help to blend the repair into the rest of the surface and make it less noticeable.
Use the hairdryer to heat up the repair area and help the adhesive set.
If you’re using an old hairdryer, make sure it doesn’t overheat and damage the plastic. Heat the repair area for about 30 seconds or until the plastic is soft. You can also use a heat gun, but be careful not to melt the plastic.
Your car’s leather seat is now repaired!
The tear in the leather has been mended and the seat looks as good as new. You can now enjoy your car’s comfortable seats without worry.